How To Manually Update A Plugin In WordPress
Usually, when you’re updating a plugin, you would click the update button in the plugin list, and that’s how automatic plugin updates are done. Still, there can be reasons to do it manually if it’s a specific license, the auto-update feature is struggling, or you have issues with your folder permissions.
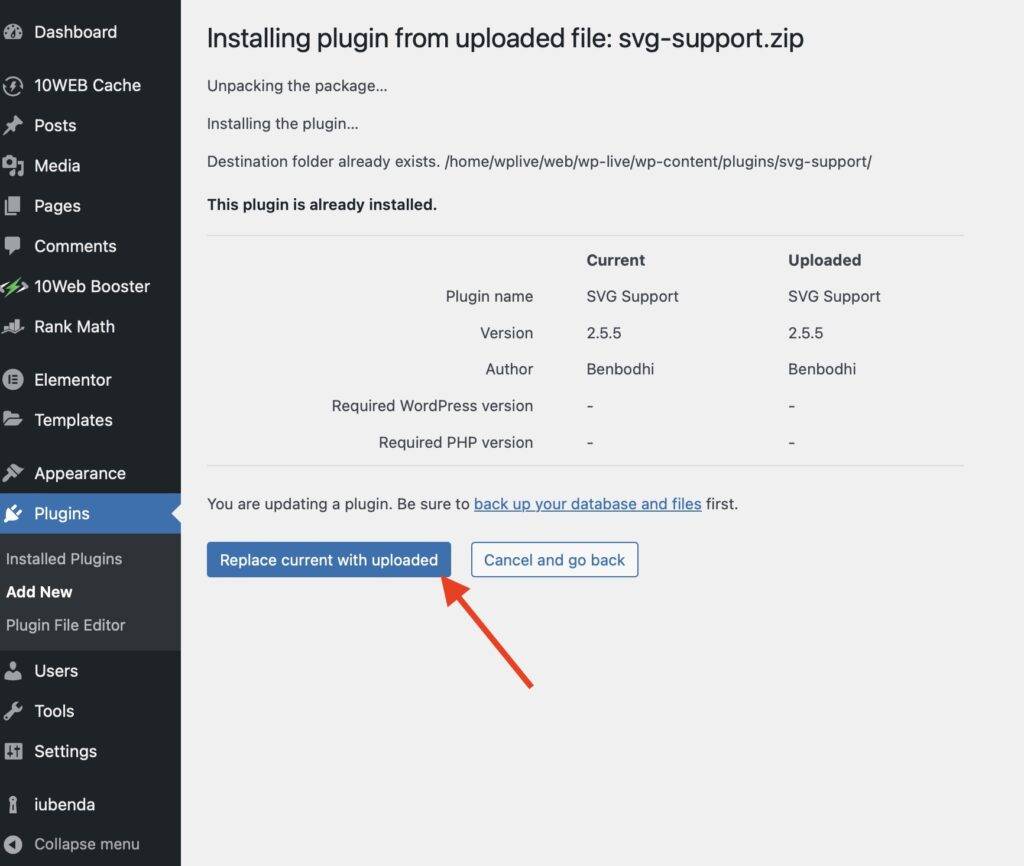
To manually update your plugins, sign in to your WordPress admin and go to Plugins -> Add new -> Upload plugin. Upload your plugin and press install now. WordPress will now prompt you for what version to use. Choose the latest version by pressing Replace current with uploaded.
This is the simplest, most straightforward way to update your WordPress plugin manually, but there are 2 other methods, and I’ll also dive a little more into the method mentioned above. Because often, when you buy premium plugins, the plugin developers haven’t always added an automatic update feature.
How To Manually Update A WordPress Plugin Via WordPress Admin
Usually, we would head over to the plugins tab in WordPress admin, find the plugins we want to update and press update on each plugin. This would ensure automatic updates. You can also mark multiple and choose update in the dropdown, to update multiple at once.
There can be reasons you would need to go through a manual update process, and the most straightforward way is to do it in the WordPress admin dashboard, where you upload your WordPress plugin as a ZIP file.
To manually update your outdated plugins go to Plugins -> Add new -> Upload plugin. Upload your plugin as a zip file, and then on WordPress’s next screen, choose “Replace current with uploaded”. This screen only shows when the plugin exists already.

You have now updated your plugin manually in the most straightforward way. But if you’re experiencing issues with this method, then I would recommend you do it via an FTP client like FileZilla, which I’m diving into in the next section.
[cboxarea id=”cbox-DZ7YzH84qT48YAf1″]
How To Manually Update A WordPress Plugin Via FTP/SFTP
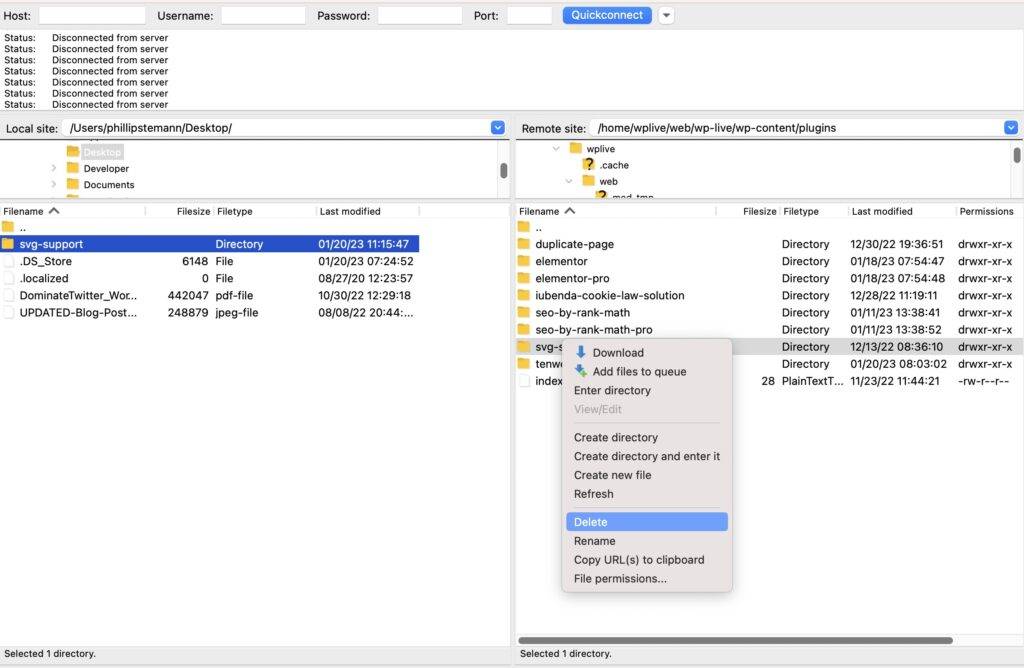
There are 2 ways to do it using an FTP client like FileZilla. When you have signed in to your server, you need to go to the plugins directory, which you find via wp-content -> plugins. Now you can choose to do 2 things. Either delete the entire plugin directory and upload it as a new one.
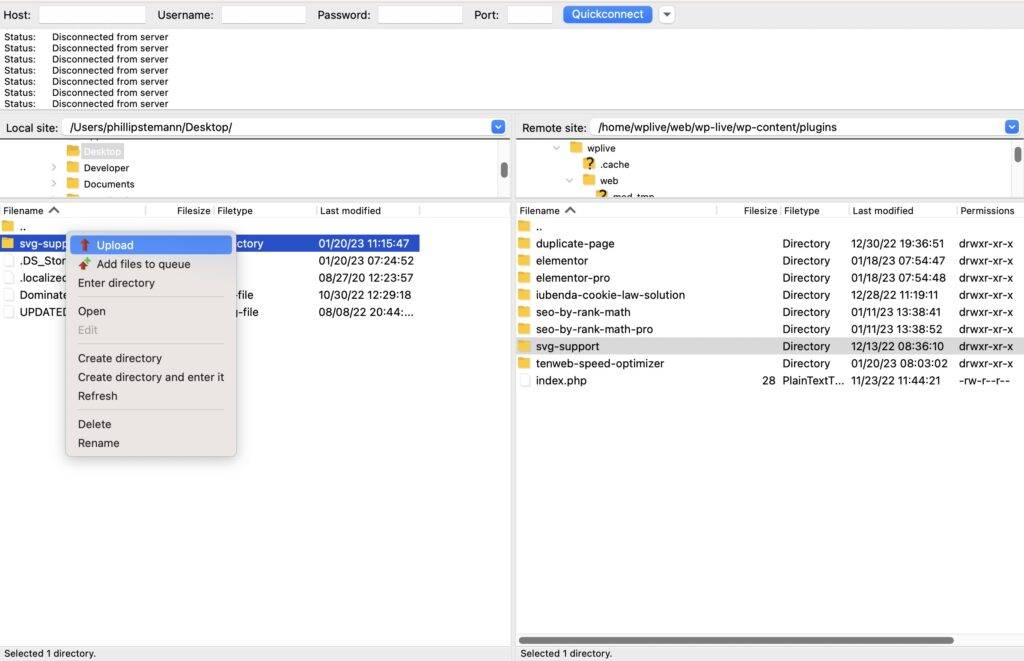
Or you overwrite your plugin folder with all the plugin files to ensure the newest version replaces your current version.
Suppose you use FileZilla, which I’ll recommend you do. Then you simply right-click on the plugin folder you wish to delete and press delete. If you want to overwrite your plugin, right-click on the folder of the newest plugin on the left side and press upload. You can see the 2 solutions in the images.


After doing this, you’re done and have not uploaded the newest version of your plugin.
How To Manually Update A WordPress Plugin Via WP-CLI
Now to the last method. If the previous 2 methods haven’t worked, this one won’t work either, as it’s an alternative to using the SFTP/FTP method.
It’s effortless. As soon as you’re connected to your WordPress website through the WP-CLI, you just run one command, and then the WP-CLI updates your plugin.
So open up your terminal on your computer and enter the following command:
wp plugin update [plugin-slug]The plugin slug is the folder name, as seen above. So if we were to update SVG Support, we would write:
wp plugin update svg-supportYou can also update all your plugins using the WP-CLI and much more. If you want to see the rest of the command, you can head over to the documentation of WP-CLI for plugins.
FAQ
How do you know when to update a WordPress plugin?
There are 2 ways to see this. Either you go to Dashboard -> Updates, and here you will get a list of all plugins, themes and translations which needs to be updated.
Alternatively, you can go to Plugins in WordPress admin, in the menu, and every plugin with an update will have an extra message where you can click update.
How do I force WordPress to check for plugin updates?
If you go to Dashboard -> Updates, then WordPress will be forced to check all plugins, themes and translations for updates. Be aware that some plugins push out updates to groups of websites not to overload their servers. In this case, you will have to wait until the update reaches your website.
Why can’t I update my WordPress plugin?
The most common issue is that your folders do not have the correct permissions for you to write to them. Use an FTP client like FileZilla, sign in to your server, go to wp-content and right-click on the folder plugins. Make sure permissions are all checked off, and you should now be able to update your plugins.
How do I manually disable a WordPress plugin?
There are 4 ways to do this. The easiest way is to go to WordPress admin, go to plugins, and press deactivate on the plugin you wish to deactivate.
Secondly, you can sign in via an FTP client like FileZilla and delete the plugin folder. It’ll then be deactivated automatically.
You can use the WP-CLI as a third option and run the command: wp plugin deactivate [plugin-slug].
The last option is to do it directly in the database. Sign in to your database by using an SQL client or PHPMyadmin. Click on the table wp_options and find the row names active_plugins in the column name option_name. In the column next to, named option_value, edit that column and delete all its content. Now all plugins are deactivated.


![8 Absolute Best WordPress Backup Plugins [2023] 7 8 Absolute Best WordPress Backup Plugins [2023]](https://wpenroll.com/wp-content/uploads/2023/03/8-Absolute-Best-WordPress-Backup-Plugins-768x404.png)


![9 Best WordPress Survey Plugins [Comparison] 10 9 Best WordPress Survey Plugins [Comparison]](https://wpenroll.com/wp-content/uploads/2023/03/9-Best-WordPress-Survey-Plugins-Comparison-768x404.png)